wit wisdom & food

connecting with food

  • home
  • & food
    • recipes
  • & running
  • & gardening
  • & life
  • & travel
  • & politics
  • about

Archives for August 2015

Earl Grey Iced Tea

August 24, 2015 by anne Leave a Comment

Earl Grey Iced Tea

Today’s post is from one of my favorite bloggers Susannah at Feast+West. If you love travel and food you will really enjoy her blog. We have worked on a couple of projects together and she seems to have an endless amount of ideas. She is also a whiz at graphic design. If you want to learn more about that you should keep an eye out for her new project Garnishing Co. Today she was nice enough share her love of tea. I have loved making iced tea this summer and look forward to trying the version she is sharing with us today.

As a Southern girl through and through, it’s safe to say that sweet tea is in my blood. We practically inhale the stuff down here. Sweet, refreshing and ice-cold — there’s no better remedy for a sweltering, humid day in North Carolina. (Especially if there’s a squeeze of fresh lemon juice added to the mix!)

Usually, iced tea is an occasional treat for me when I eat out, but I have been obsessed with making it myself this summer. It’s way cheaper and so much more rewarding. Plus, you have more control over the sweetness. I’ve been trying all kinds of teas and have settled on this Earl Grey Iced Tea as a favorite.

Strong and smoky, Earl Grey tea is a classic among black teas. It’s flavored with bergamot oil, which gives it a slight citrus taste and gently aromatic floral notes. You can opt for tea bags or loose leaf tea.

Drink it unsweetened if you prefer, or stir in a bit of local honey or brown sugar to give this tea a complementary sweetness. (If you’re going sweet, tailor it to your liking simply because you can! You don’t have to accept the sickly, saccharine taste of store-bought sweet tea.)

Most of all, have fun with making iced tea at home. It’s surprisingly simple to make at home. Try any kind of tea — black, red, herbal, white, green… There are lots of options!

If you enjoyed this recipe don’t hesitate getting to Feast+West’s Cocktail page.


Earl Grey Iced Tea
Print Recipe
  • Coursebeverages
Servings
2 quarts
Servings
2 quarts
Earl Grey Iced Tea
Print Recipe
  • Coursebeverages
Servings
2 quarts
Servings
2 quarts
Ingredients
  • 6 tea bags earl grey
  • 2 cups boiling water
  • 1/2-1 1/2 cups brown sugar or local honey to taste (optional)
  • 6 cups cold water
  • lemon slices for serving
Servings: quarts
Instructions
  1. Place tea bags in a large measuring cup or mixing bowl. Pour boiling water over top. Cover and let steep for 15 minutes
  2. Stir in sugar or honey, if desired, until dissolved. Pour mixture into a 2-quart pitcher. Add the cold water. Refrigerate until cold.
  3. Serve over ice with lemon slices for garnish.
Recipe Notes

Try with a variety of teas to find your favorite.

Share this Recipe
Powered byWP Ultimate Recipe

Filed Under: Uncategorized Tagged With: earl grey, iced tea, sweet tea

mise en place for the home cook

August 14, 2015 by anne 10 Comments


Mise en place /miz ɑ̃ plas/
noun
proper planning of equipment and ingredients for food service

If you read cookbooks or watch cooking shows you have heard the term Mise en place. It seem like a fancy french word that is only important to professional chefs, but I assure you it is not. Understanding and putting the practice of Mise en place to work for you in the kitchen will make every meal and party 10x’s easier for you.

When restaurant chefs talk about Mise en place they mean that each person in the kitchen should have all the ingredients they will use for the night cut, prepped and within arms reach. They will also have all of their tool (pots, pans, knives, etc.) in place and ready for use. This keeps everyone at their spot working efficiently through the night. Instead of the alternative, chefs running through the kitchen trying to cut onions for the dish that was supposed to be in the oven 5 minutes ago. The service to your table would not be as smooth if dishes were coming out at different times and there was chaos in the kitchen. This is no different in your kitchen

How do you start cooking a recipe? Do you read the recipe and as the steps mention ingredients you cut them only to find out that in step 3 you were suppose to save some of the onion you used in step 1? Now you are at step 3 and all your onion is already sautéed in a pan! This could be easily avoided.

5 step mise en place for home cooks

clean your kitchen & clear your mind
Preparing to cook is as important as cooking. Starting with a clean kitchen allows you to have more room to move and fewer obstacles in your way. If you are constantly moving dirty dishes to make room for what you are working on it is going to slow you down. So much so the prep time for the recipe could take you twice as long. Instead take the 10 minutes to tidy up the kitchen and mentally prepare to cook. If you are busy running through your to do list you are so much more likely to misread the recipe or forget an ingredient. Forget everything for a moment and and prepare to enjoy creating something in the kitchen. Before you start, focus on what you are doing and the steps that need to be done.

read the entire recipe & gather your ingredients and tools
Read the entire recipe and give some thought to how long each step takes. Get a plan together so you know what time you need to have something in the oven or on the stove to ensure dinner will be on the table at your planned time. Now gather all the ingredients you are going to need and any tools. I try to gather my ingredients and set my pots or pans out on the stove before I start chopping anything. The rest of the tools are within arms reach so I don’t worry about dragging everything out during this step. This is also where I preheat the oven if needed.

preps all your ingredients
Chop, dice, mince, wash, whatever it is the recipe calls for get it done now. Put each ingredient in a small bowl so it is easy to grab when you are ready for it. It may seem like overkill but I promise you it will make the actual cooking time that much smoother. They don’t do this on the cooking shows for no reason. They do it because it is more efficient. If dishes aren’t your thing you can use paper towel, or paper plates. Just get it all prepped and ready before you even heat the oil in the pan.

read the recipe again
Now that you are all prepped, read through the recipe and make sure all the steps make sense. You might catch a step here that you missed earlier that will save you frustration down the road.

cook
With everything in front of you start cooking. After a couple of times through the recipe and all your ingredients ready to go you will find even the most complicated recipes will seem easy.

What other kitchen terms would you like explained? Something keep coming up in a cookbook or on a show that you wish made more sense? Leave it in the comments and I will get to it in future kitchen vocab pieces.

Filed Under: Uncategorized

how to store and eat cilantro

August 10, 2015 by anne 7 Comments

Cilantro is a love or hate herb. There is rarely a middle ground found when people are talking about cilantro. Some, like myself, love its citrusy flavor and others swear it tastes like soap. Studies have been done that link the difference in taste to a genetic disposition. If you don’t like cilantro it might not be your fault. You might have just been born a cilantro hater. For you I can offer only condolences. For the lovers of cilantro how about some tips on how to store and eat cilantro?

I really like cilantro. Like I could put it on damn near anything. I always try to have a bunch on hand in the kitchen. My love for it is a kind of chicken or an egg situation. Do I like cilantro because I like Mexican food or do I like Mexican food because I like cilantro? Which came first? The more fresh-cut cilantro on my tacos or in my guacamole the better. In my opinion, a street style taco with meat, onion and cilantro doesn’t need anything else except maybe a squeeze of lime. The natural citrusy flavor of cilantro makes pairing it with lime a great combination. My new favorite use of this combo is coconut lime cilantro rice. It makes my mouth water just thinking about these dishes.

Cilantro facts:

  • Cilantro goes by many names such as Chinese parsley, dhania, and coriander.
  • In North America the leaves of the herb are commonly referred to as cilantro and the fruit, or seeds are called coriander.
  • The seeds have much more of a citrus flavor when crushed. You can purchased ground coriander or seeds in the spice section.
  • Used largely in Asian and Latin American cooking.
  • Frequently mistaken for curly leafed parsley.

Season: year round

Where to find it in the store: Found in the produce section it is typically sold in bunches. Some stores will have it prepackaged in bags or plastic cases though that is less common. I prefer to buy mine in bunches because I find it easier to store which means it lasts longer

What to look for when you buy: Bright green leaves that are not wilting, or browning.

How to store it: Treat your bunch of cilantro similar to a bouquet of flowers. Place the stems in a jar of water. For maximum shelf life cover the jar with a plastic bag and a rubber band and place in the fridge. I use mine fairly quickly so I skip the plastic bag step and have been able to store my bunches for just over a week in the fridge. If I know I will use it in a couple of days I just keep it on the counter. For best results change the water every couple of days.

If you do find cilantro in a plastic bag, or storing in a plastic bag is easier for you, you can keep it in a plastic bag in the fridge for a week.

When ready to use: Rinse the sprigs of cilantro with water and pat dry. Then, simply chop up as much as you need for the recipe. Both the stems and the leaves are edible. A whole sprig also works great as a garnish.

Links to some great recipes:

  • Not just one but many from 101 Cookbooks
  • Parmesan Cilantro corn from Real House Moms
  • Cilantro Pesto, yes please! from Simply Whisked
  • Cilantro-Lime Popcorn from Bake Your Day


Are you a lover or a hater of cilantro?

Filed Under: ingredients Tagged With: mexican food, tacos

pickled radishes quick

August 5, 2015 by anne 2 Comments

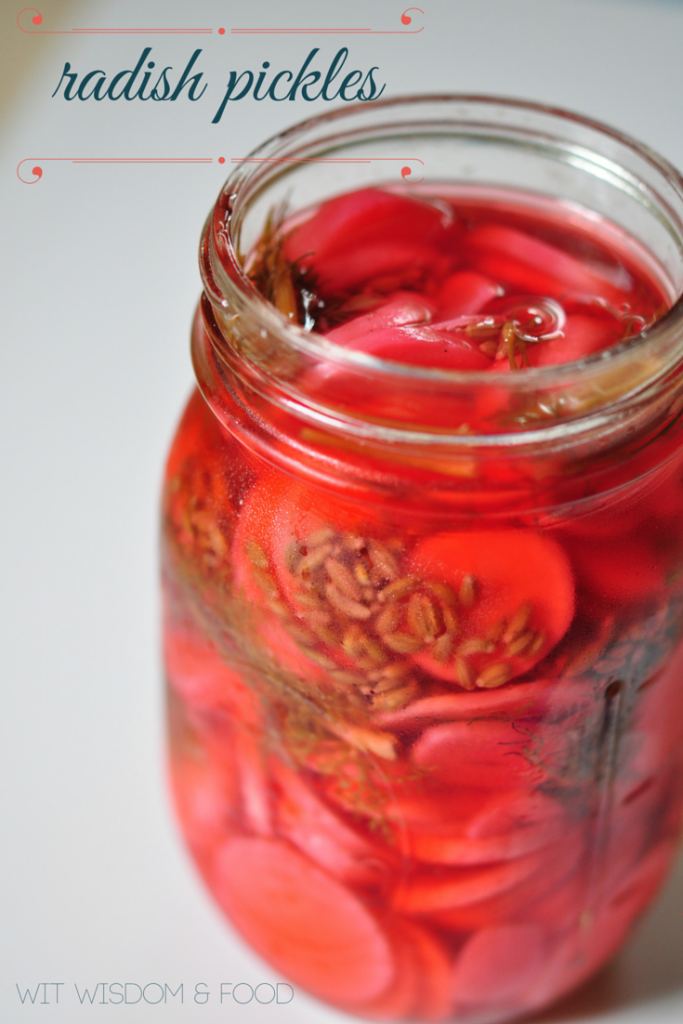
radish pickles quick

There is a misconception that pickling something has to take all day. This must come from the images of grandmothers sitting in the kitchen with bushel after bushel of cucumbers making enough pickles to last all winter. I know that is what I think of, well not grandma, but my mother. She would spend days putting the garden bounty to good use. Let’s all wipe that image from our heads and get ready to learn how to make pickles in under an hour.

The pickles, or quick pickles as they are frequently called, won’t last you the winter but they will go a good couple of weeks in the fridge. That is assuming you don’t eat them well before a few weeks are up. You can use the same process to can pickles that will last through the winter. If that is your goal you can make enough for a family of 4 in an afternoon. You can learn more about that process and get some recipes from this article I wrote for Wayfair.

Today we are on quick pickles. The sky is the limit with this method. You can pickle darn near anything. To prove the point I had some pickled blueberries on a sandwich the other day. They were delicious and likely made in the exact same way as these radishes. I am looking into this so we can have them on a salad in the near future. I will be sure to get back to you when I have them finished.

My radishes were inspired by The Picnic Cookbook which was the first cookbook for the cookbook club. They listed a variety of vegetables you could do such as beets, green beans, fennel and the traditional cukes. I took a little spin on this because radishes were on sale, they sounded good and apple cider vinegar was all that I had on hand. I was very happy how they turned out and couldn’t stop eating them once I opened the jar. They were a perfect topping for a pork tenderloin sandwich the other night.

The basic process is to prep a fruit or vegetable of your choice, make a brine, pour brine over said fruit or vegetable and refrigerate. Since you aren’t trying to store these at room temperature you don’t have to be as concerned with the acid levels and the safety of the food. This allows you wing the recipes a little more than you can with traditional canning. Big win for you. You can experiment with vinegars, seasonings and ratios to water until you find your perfect mixture.

Before this did you think all pickling was hard or took all day?

pickled radishes
Print Recipe
Quickly pickled radishes that are good for sandwiches, burgers, salads or a quick snack.
  • Coursecanning, vegetable
Servings Prep Time
1 jar 15 minutes
Cook Time Passive Time
20 minutes 4 hours
Servings Prep Time
1 jar 15 minutes
Cook Time Passive Time
20 minutes 4 hours
pickled radishes
Print Recipe
Quickly pickled radishes that are good for sandwiches, burgers, salads or a quick snack.
  • Coursecanning, vegetable
Servings Prep Time
1 jar 15 minutes
Cook Time Passive Time
20 minutes 4 hours
Servings Prep Time
1 jar 15 minutes
Cook Time Passive Time
20 minutes 4 hours
Ingredients
  • 3/4 lb radishes greens removed
  • 4 fennel fronds
  • 5 cloves garlic, sliced
  • 1 Tablespoon fennel seeds
  • 1 1/4 cup apple cider vinegar
  • 1 cup water
  • 2 Tablespoons wildflower honey
  • 1 1/2 teaspoons kosher salt
Servings: jar
Instructions
  1. rinse radishes and slice in 1/4 inch rounds
  2. Pack radishes, fennel frond and garlic into a half-pint canning jar.
  3. Put fennel seeds, apple cider vinegar, water, honey and salt in a sauce pan and heat to a rolling boil. Stir to dissolve honey and salt.
  4. Remove brine from heat and pour over radishes. Make sure the radishes are covered by the brine
  5. Allow the brine and radishes to come to room temperature, 70°F. This should happen within 2 hours. Cover jar and place in fridge.
  6. Let cool completely. For the best pickles leave them for at least a day before eating. Will keep in the fridge for about a month, or until you eat them all. Whichever comes first.
Share this Recipe
Powered byWP Ultimate Recipe

Filed Under: canning, recipes

As a home cook and gardener, a former grocery store manager, and an advocate for improving our food system I have thousands of hours of research and real-world experience on how to get good food on our plates. My new challenge and my main focus is how to encourage my daughter to love food & eating as much as we do.

Search

Get a seat at the table

Follow the journey to help my daughter develop good eating habits and to know where her food comes from.

When you sign up you will get an easy to use digest of ideas and news for encouraging your kid to have good eating habits, to help you stay on top of trends and seasonal recipes.
* = required field

powered by MailChimp!

Post Calendar

August 2015
M T W T F S S
« Jul   Sep »
 12
3456789
10111213141516
17181920212223
24252627282930
31  

Goodreads

Resources

  • Reading list
  • recipes
twitter pinterest instagram facebook mail

About

  • about
  • legal disclosures and privacy policy

Copyright © 2019 · Lifestyle Pro Theme on Genesis Framework · WordPress · Log in